It becomes necessary to Generate UPI for Net banking, as having UPI for net banking enabled for the bank account provides many facilities such as payments made through UPI ID, UPI linking with various other payments wallets like MobiKwik, Phonepe, Google pay, and Bhim UPI.
In order to get Internet banking services in India, your age must be 18 or above.

So in order to get Net banking, UPI pin, and sign-up with various payment wallets in India- You have to follow all the steps discussed below in this article.
How to get Net Banking in India?
- Step 1- Just visit your respective bank and ask for an Internet banking form, fill up that form and submit it on the appropriate counter.
Nowadays various banks are now providing net banking facilities at your doorsteps, which means that there is no need for visiting banks. But for SBI users you will need to visit your branch in all the conditions.
- Step 2- If you are an State bank customer, then the bank person will provide you two things, one is “user name and password for Net banking through SBI website” and one more password for “SBI YONO App”.
Note: The username and the password will be temporary, the bank person will also ask you to regenerate the following things for security reasons.
Step 3- Don’t forget to take your mobile phone with you, as it will be required to install and set up the SBI YONO app by the authorized bank person on your mobile phone.
Once the bank person setup the SBI YONO in your mobile, you will also be provided with the temporary MPIN (a pin required to login to your YONO app).
Step 5- Once everything is set up, you will need to reset your password and username both on your own. You will require your registered sim card with the bank to make any credential changes for your net banking.
Note: If you have a debit card then you can register in the SBI YONO on your own, but it will require the digital signature of an authorized bank person, so you have to visit your SBI branch in any condition.
For more information regarding this, you can visit the SBI website and can also contact SBI customer care.
How to Generate a UPI ID for Net banking?
What is UPI? A UPI stands for unified payments ID, which facilitates payments and receiving of money through a common UPI ID from any bank to any bank. UPI ID and UPI pin are two different things. UPI ID helps you to receive payments from others, while a UPI pin helps you to successfully make payments through your UPI-linked bank account.
In order to get UPI ID and PIN (UPI pin is a 6 digit code), you will need to install an application called “BHIM UPI App“. Once you have installed the BHIM application, you can link your bank account and can generate UPI PIN and also this application will automatically provide you with the UPI ID which can be used to directly receive payments directly in your bank account.
Note: You have to insert the same sim card in your mobile phone that has been linked to your bank account, in order to register with the BHIM app.
So once you have set up the UPI ID, you can link your UPI with various online payment wallets and can make payments by using the UPI pin.
How to register and set up a Mobikwik wallet and Generate UPI for Net banking?
- Step 1- Install Mobikwik app from trusted platforms like Google play store.
- Step 2- Open mobikwik application and click on user Icon in top right corner, and again click on accounts.
- Step 3- Now you can add your bank account and also you can link your debit and credit cards.
- Step 4- Once you have linked your bank account, there is no need to setup UPI, as mobikwik gives you automatically generated UPI ID as “your mobile no@ikwik”.
- Step 5- Now you are done, you can make payments, and it will ask you to enter UPI pin which you have generated through BHIM UPI app.
Mobikwik will also provide you with the QR code (linked with the UPI ID) for the scan and pay feature.
How to set up Phonepe and Generate UPI for Net banking?
- Step 1- Install and open Phonepe app.
- Step 2- Now click on user Icon at top left corner.
- Step 3- And then you will see “payments methods“, just click on add bank account and add a bank account, and click on cards and just link your debit and credit cards.
- Step 4- Now you will also see the option of PI ID there, Phonepe automatically provides you the self generated UPI ID and it also provides you the feature to create multiple UPI ID’s.
Also read-
Benefits of UPI, how to get an Amazon cashback voucher?
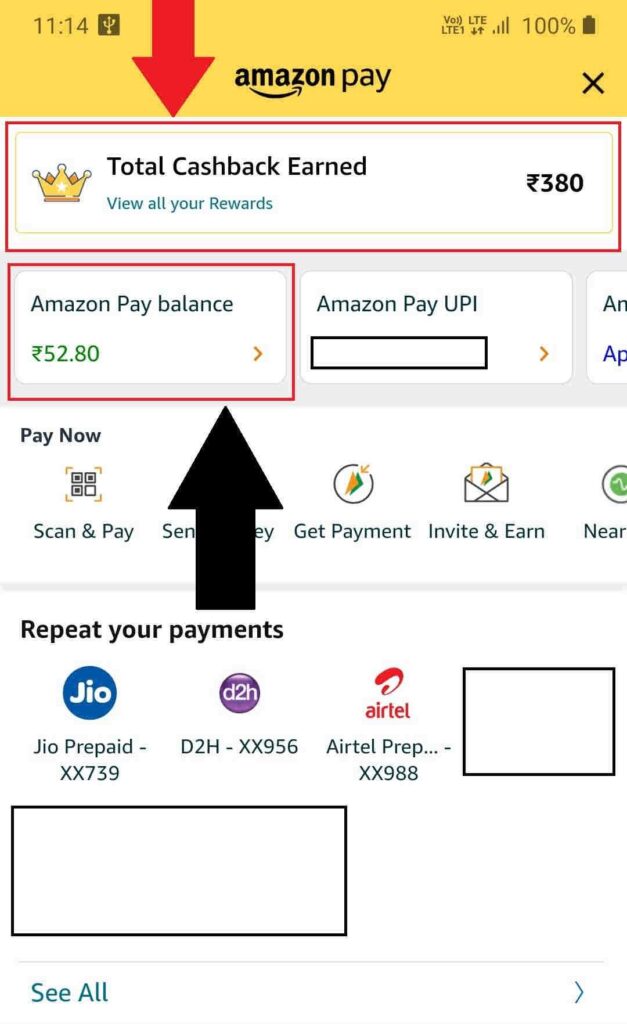
One of the greatest benefits of UPI is that nowadays many payments wallets are providing a huge amount of cashback on UPI payments, and one of the APP is the Amazon shopping app that has provided me around ₹ 380 as you can see in the below image:

In order to get Cashback on the Amazon shopping app, just follow the below procedure:
- Open amazon app and clcik on setting and then on “Amazon pay”
- Now, click on rewards section and you will be shown with multiple cashback rewards option, like rewards on mobile recharge and rewards on electricity rewards.
- Just click on “collect rewards” and make a successful payments by using “amazon pay UPI only”
- After few minutes, your amazon cashback amount will be credited to your amazon pay wallet.

